
In this tutorial we will cover how to install WizardPanel for WordPress. This guide also includes how to install the integration template of our supported software (WHMCS, Blesta, Clientexec etc).
WizardPanel Installation
In this section we will show you how to install WizardPanel complete with designs and demo content to match the live demo.
1)Make a full backup of your WordPress (files and database) for safety
2)Download the WizardPanel for WordPress zip file from inside your Zomex.com account.
3)Extract the ZIP file to your desktop.
4)You have 2 options for installing:
WordPress Upload
Using WordPress you can upload WizardPanel and your chosen design(s) from within your admin panel. This is the recommended method of installation as it's quick and easy.
5.1)Login to your WordPress admin panel and visit > Plugins
5.2)In the top left of the page click on the Add New button. Then click on the Upload Plugin button.
5.3)Click on the Browse button and open the upload folder of the ZIP, select the wizardpanel_upload.zip file and click Install Now.
Having issues on this page?
Upload failed - this error will show if you select the wrong zip as the upload. Instead you need to select the wizardpanel_upload.zip file which is contained within upload folder of the main extracted zip
Maximum file size error - this means that the file upload size limit on your server is lower than the size of the WizardPanel. You will need to update the PHP memory limit on your hosting account within the PHP settings. You could also use the FTP installation method as an alternative.
5.4)Activate WizardPanel from the plugins page. WizardPanel will now show within your left WordPress menu.
5.5)Vist the WizardPanel menu. You should now see a the license page. Copy/paste your license key (found in your Zomex order confirmation email) and click the save changes button. WizardPanel will now show that your license is activate and display all of the tabs (company, header etc). If you're experiencing issues with your license please contact us.
5.6)Visit > Appearance > Themes. You can upload as many designs as you like, all of which are included with WizardPanel.
5.7)In the top left of the page click on the Add New button. Then click on the Upload Theme button.
5.8)Click on the Browse button and open the upload folder of the ZIP, select the design you would like to install. E.g design_stellar_upload.zip and click Install Now.
Having issues on this page?
Upload failed missing style.css - this error will show if you select the wrong zip as the upload. Instead you need to select the design_stellar_upload.zip file which is contained within the upload folder of the main WizardPanel zip
Maximum file size error - this means that the file upload size limit on your server is lower than the size of the design. You will need to update the PHP memory limit on your hosting account within the PHP settings. You could also use the FTP installation method as an alternative.
5.9)Your design will now show within the themes page. Hover over the design you want to use and click on the Activate button. Visit WizardPanel > Designs. You should see your active design selected here. Click on the Set Default Display Settings button. This will match the display settings of the design demo.
WizardPanel and your chosen design are now successfully installed. You can repeat this step to install more or all designs from the ZIP. You should now move onto importing the demo content.
FTP
Using FTP is another good way to install WizardPanel.

5.1)Open up your FTP client (e.g FileZilla) and login to your web hosting account as normal. On the left side (your local computer's files) navigate to the upload-ftp folder as seen above. On the right side (your web hosting account) navigate to your WordPress root folder. Select all from the left side, then upload.
5.2)Login to your WordPress admin panel and visit > Plugins.
5.3)Activate WizardPanel from the plugins page. WizardPanel will now show within your left WordPress menu.
5.4)Visit the WizardPanel menu. You should now see the license page. Copy/paste your license key (found in your Zomex order confirmation email) and click the save changes button. WizardPanel will now show that your license is activate and display all of the tabs (company, header etc). If you're experiencing issues with your license please contact us.
5.5)Login to your WordPress admin panel and visit > Appearance > Themes.
5.6)Your design will now show within the themes page. Hover over the design you want to use and click on the Activate button. Visit WizardPanel > Designs. You should see your active design selected here. Click on the Set Default Display Settings button. This will match the display settings of the design demo.
WizardPanel and your chosen design are now successfully installed. You should now move onto importing the demo content.
Import Demo Content
Now WizardPanel has been activated we recommend setting up the demo content, this will match our live demo with pre-made content making it easy to edit your website to your needs. We include demo content for all of our designs. Either demo content can be used for all designs but we recommend using the demo content for your chosen design to match the demo.
Content Import
The first step of the demo content is to run the content import. This step will add the pages, posts & menus from the design demo.
6.1)Navigate to WordPress Admin > Tools > Import
6.2)Scroll down to WordPress. If you have not used this feature before click on the Install Now link. If you have used it in the past click on the Run link.
6.3)Next click on the Browse button which will prompt an upload box. Within the extracted ZIP from step 3 access the Content Import folder. Select the demo-import.xml file and then check the Download and import file attachments setting.
6.4)Click on the Upload file and import button to run the import. This should take up to a minute to see the import success confirmation.
The demo content (pages, menus, attachments) will now be imported to your WordPress installation.
Set The Menus
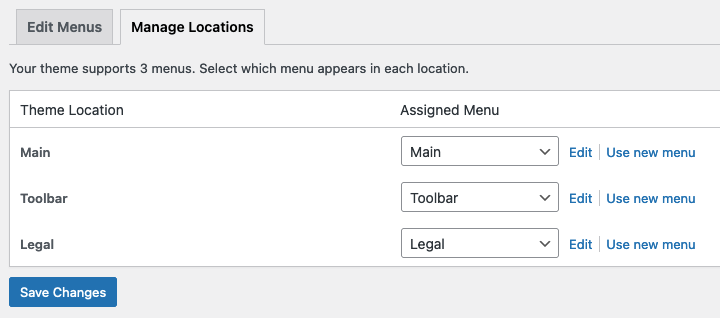
Now the pages and menus have been imported it's time to assign each menu to the correct location.
7.1)Navigate to WordPress Admin > Appearance > Menus.
7.2)Click on the Manage Locations tab and set each menu to the corresponding location (as shown above in the above image) and click save.
Set The Widgets (Footer & Sidebar)
The footer and sidebar are set using Widgets. Widgets allow you to add blocks of content to specific areas of the theme.
8.1)Navigate to WordPress Admin > Appearance > Widgets.
8.2)Open the widgets folder within the content import folder of the WizardPanel download.
8.3)Open the overview.png image to view the widgets arrangement. Match the same widgets as we are using, content based widgets are found within the README.txt file. For example the Footer Column 1 location uses the Menu widget with the Footer - Services menu assigned.
Elementor Support
By default WizardPanel uses the WordPress block based pages (Gutenberg) with shortcode (similar to HTML). As such Elementor is not required to use. However we have added optional support for Elementor so you can customize the majority of your websites content using the easy to use visual editor. View our complete guide below.
WizardPanel Installation Completed
Your WizardPanel installation is now complete. When visiting the front-end of WordPress you should see your chosen design along with all pages and content matching the demo.
WizardPanel also supports various software integrations to add functionality to your website. If you have purchased a software integration template continue the guide below.
Supported Software
Now that your website has been installed there is the option to integrate software. The software will add functionality to your website (account system, carts, payments, reporting, support tickets etc) which will allow you to run a fully automated business. For example you could integrate WHMCS to provide automated web hosting services, use your website plus Blesta to provide software or use your website plus Clientexec to provide web design services. Each of the software is well suited to many kinds of online businesses, budgets etc. You will only need to use one software and have the choice between multiple options that we support including WHMCS, Blesta, Clientexec, WISECP, HostBill & FOSSBilling.
Select Software For Installation Guide
WHMCS Integration Installation
In this section we will show you how to integrate WHMCS with your website.
This guide assumes that you already have WHMCS installed. We recommend that WHMCS is installed in a sub-directory such as domain.com/clients/ (with your WordPress website installed on domain.com).
Install The WHMCS Integration Template
Make a full backup of your WHMCS files and database for safety
Download the Software Integration - TemplateName - WHMCS Integration.zip file from inside your Zomex.com account.
Extract the ZIP file to your desktop
Upload the contents of the upload directory to your WHMCS root directory. For example if WHMCS is installed at domain.com/clients the directory to upload to would be: /public_html/clients/
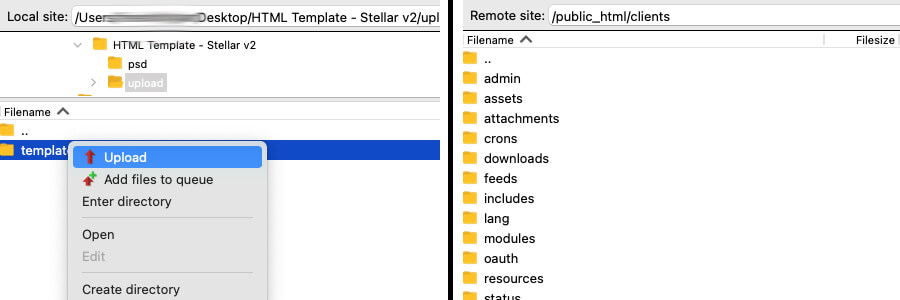
Activate the template:
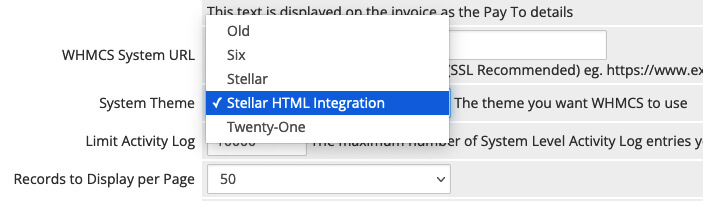
Lastly to activate your WHMCS Integration template login to your WHMCS admin area and go to Configuration () > System Settings > General Settings > Select your template under System Theme and save.
Activate WHMCS Integration In Wizard Panel
The next step is to set WHMCS as the software integration within the WizardPanel options panel.
Login to your WordPress Admin panel and click on the Wizard Panel button in the left sidebar.
Click on the Software Integration tab within the left menu. This tab is home to all of the software integration options and content.
Set the Software Integration to on.
For the Select Software dropdown select WHMCS.
Set the full URL to your software path (e.g https://website.com/clients/).
If your software is installed on a sub-domain (e.g https://clients.website.com/) set the dropdown to on.
Click of the Save Changes button to apply the changes.
Integrate Your WordPress Theme Header/Footer With WHMCS.
The final step is to apply the header/footer of your website to the WHMCS Integration Template.
Scroll down to the Integration Code of the Software Integration tab. These blocks of code make up an exact copy of your website which is used to create a matching integration for WHMCS.
Head
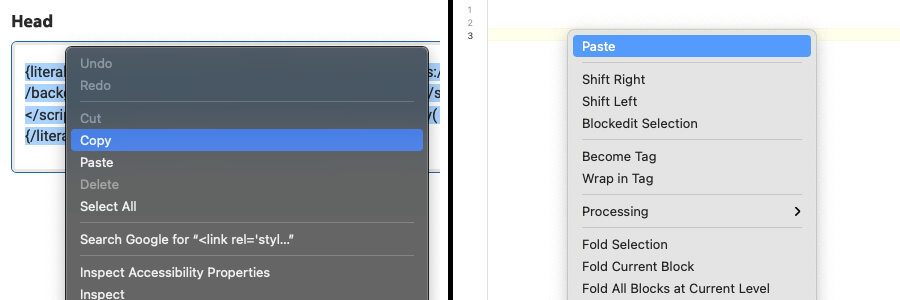
Copy the code from the Head box and paste in the following file:
/public_html/clients/templates/designname-software-integration-whmcs/integration/integration-head.html
Header
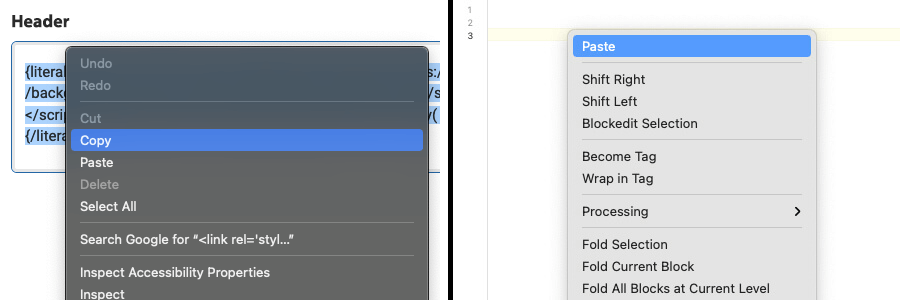
Copy the code from the Header box and paste in the following file:
/public_html/clients/templates/designname-software-integration-whmcs/integration/integration-header.html
Content Top
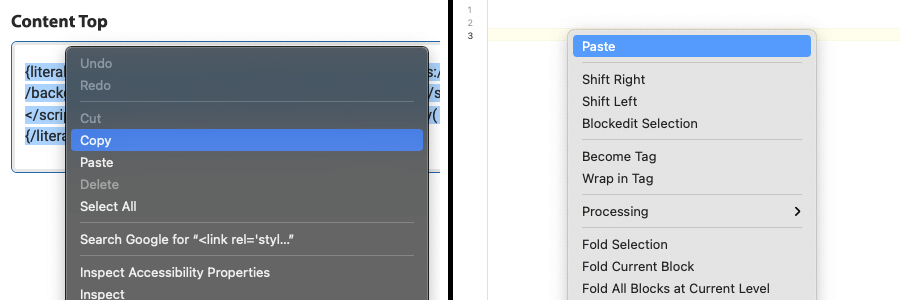
Copy the code from the Content Top box and paste in the following file:
/public_html/clients/templates/designname-software-integration-whmcs/integration/integration-content-top.html
Content Bottom
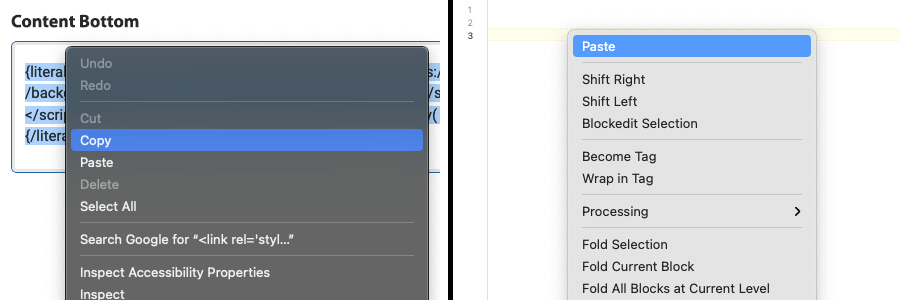
Copy the code from the Content Bottom box and paste in the following file:
/public_html/clients/templates/designname-software-integration-whmcs/integration/integration-content-bottom.html
Footer

Copy the code from the Footer box and paste in the following file:
/public_html/clients/templates/designname-software-integration-whmcs/integration/integration-footer.html
WHMCS Integration Completed
The integration with WHMCS is now completed. When you view your WHMCS you should now see your the header/footer/color scheme & settings match your WordPress website. The links in the menus and footer should work correctly going between WordPress (e.g Company, Web Hosting) and WHMCS (e.g Client Area, Cart).
On-going changes to your header/footer
The integration between your website and WHMCS Integration Template are static. If you make changes to your websites header/footer (e.g edit the menu, change color scheme) you will need to re-process the code in Integration Code. Generally after you have launch your business you will not need to update your website too frequently but for when you do the integration process is quick and easy. Learn more about the software integration, how it works and why we don't automatically sync these changes here:
Software Integration Explained
Blesta Integration Installation
In this section we will show you how to integrate Blesta with your website.
This guide assumes that you already have Blesta installed. We recommend that Blesta is installed in a sub-directory such as domain.com/clients/ (with your WordPress website installed on domain.com).
Install The Blesta Integration Template
Make a full backup of your Blesta files and database for safety
Download the Software Integration - TemplateName - Blesta Integration.zip file from inside your Zomex.com account.
Extract the ZIP file to your desktop
Upload the contents of the upload directory to your Blesta root directory. For example if Blesta is installed at domain.com/clients the directory to upload to would be: /public_html/clients/
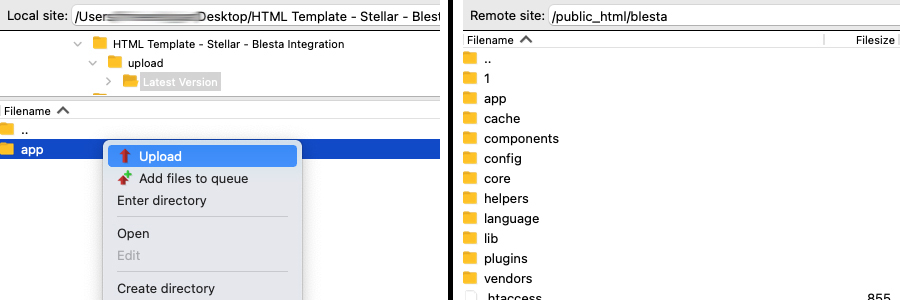
Activate the template:
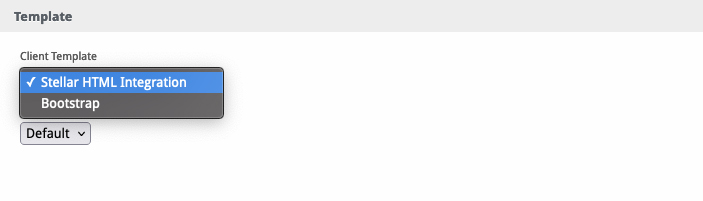
Lastly to activate your Blesta Integration template login to your Blesta admin area and go to Settings () > General > Template > Select your template under Client Template and save.
Activate Blesta Integration In Wizard Panel
The next step is to set Blesta as the software integration within the WizardPanel options panel.
Login to your WordPress Admin panel and click on the Wizard Panel button in the left sidebar.
Click on the Software Integration tab within the left menu. This tab is home to all of the software integration options and content.
Set the Software Integration to on.
For the Select Software dropdown select Blesta.
Set the full URL to your software path (e.g https://website.com/clients/).
If your software is installed on a sub-domain (e.g https://clients.website.com/) set the dropdown to on.
Click of the Save Changes button to apply the changes.
Integrate Your WordPress Theme Header/Footer With Blesta.
The final step is to apply the header/footer of your website to the Blesta Integration Template.
Scroll down to the Integration Code of the Software Integration tab. These blocks of code make up an exact copy of your website which is used to create a matching integration for Blesta.
Head
Copy the code from the Head box and paste in the following file:
/public_html/clients/app/views/client/designname-software-integration-blesta/integration/integration-head.html
Header
Copy the code from the Header box and paste in the following file:
/public_html/clients/app/views/client/designname-software-integration-blesta/integration/integration-header.html
Content Top
Copy the code from the Content Top box and paste in the following file:
/public_html/clients/app/views/client/designname-software-integration-blesta/integration/integration-content-top.html
Content Bottom
Copy the code from the Content Bottom box and paste in the following file:
/public_html/clients/app/views/client/designname-software-integration-blesta/integration/integration-content-bottom.html
Footer
Copy the code from the Footer box and paste in the following file:
/public_html/clients/app/views/client/designname-software-integration-blesta/integration/integration-footer.html
Blesta Integration Completed
The integration with Blesta is now completed. When you view your Blesta you should now see your the header/footer/color scheme & settings match your WordPress website. The links in the menus and footer should work correctly going between WordPress (e.g Company, Web Hosting) and Blesta (e.g Client Area, Cart).
On-going changes to your header/footer
The integration between your website and Blesta Integration Template are static. If you make changes to your websites header/footer (e.g edit the menu, change color scheme) you will need to re-process the code in Integration Code. Generally after you have launch your business you will not need to update your website too frequently but for when you do the integration process is quick and easy. Learn more about the software integration, how it works and why we don't automatically sync these changes here:
Software Integration Explained
Clientexec Integration Installation
In this section we will show you how to integrate Clientexec with your website.
This guide assumes that you already have Clientexec installed. We recommend that Clientexec is installed in a sub-directory such as domain.com/clients/ (with your WordPress website installed on domain.com).
Install The Clientexec Integration Template
Make a full backup of your Clientexec files and database for safety
Download the Software Integration - TemplateName - Clientexec Integration.zip file from inside your Zomex.com account.
Extract the ZIP file to your desktop
Upload the contents of the upload directory to your Clientexec root directory. For example if Clientexec is installed at domain.com/clients the directory to upload to would be: /public_html/clients/

Activate the template:
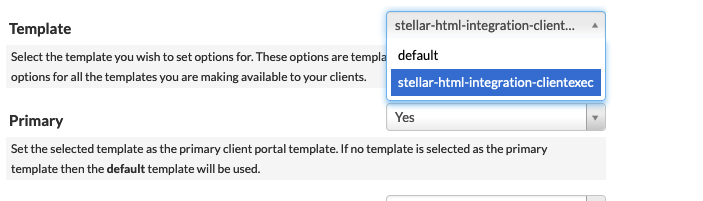
Lastly to activate your Clientexec Integration template login to your Clientexec admin area and go to Settings > Public Style > Select your template under Template, set Primary to yes and save.
Activate Clientexec Integration In Wizard Panel
The next step is to set Clientexec as the software integration within the WizardPanel options panel.
Login to your WordPress Admin panel and click on the Wizard Panel button in the left sidebar.
Click on the Software Integration tab within the left menu. This tab is home to all of the software integration options and content.
Set the Software Integration to on.
For the Select Software dropdown select Clientexec.
Set the full URL to your software path (e.g https://website.com/clients/).
If your software is installed on a sub-domain (e.g https://clients.website.com/) set the dropdown to on.
Click of the Save Changes button to apply the changes.
Integrate Your WordPress Theme Header/Footer With Clientexec.
The final step is to apply the header/footer of your website to the Clientexec Integration Template.
Scroll down to the Integration Code of the Software Integration tab. These blocks of code make up an exact copy of your website which is used to create a matching integration for Clientexec.
Head
Copy the code from the Head box and paste in the following file:
/public_html/clients/templates/designname-software-integration-clientexec/integration/integration-head.html
Header
Copy the code from the Header box and paste in the following file:
/public_html/clients/templates/designname-software-integration-clientexec/integration/integration-header.html
Content Top
Copy the code from the Content Top box and paste in the following file:
/public_html/clients/templates/designname-software-integration-clientexec/integration/integration-content-top.html
Content Bottom
Copy the code from the Content Bottom box and paste in the following file:
/public_html/clients/templates/designname-software-integration-clientexec/integration/integration-content-bottom.html
Footer
Copy the code from the Footer box and paste in the following file:
/public_html/clients/templates/designname-software-integration-clientexec/integration/integration-footer.html
Clientexec Integration Completed
The integration with Clientexec is now completed. When you view your Clientexec you should now see your the header/footer/color scheme & settings match your WordPress website. The links in the menus and footer should work correctly going between WordPress (e.g Company, Web Hosting) and Clientexec (e.g Client Area, Cart).
On-going changes to your header/footer
The integration between your website and Clientexec Integration Template are static. If you make changes to your websites header/footer (e.g edit the menu, change color scheme) you will need to re-process the code in Integration Code. Generally after you have launch your business you will not need to update your website too frequently but for when you do the integration process is quick and easy. Learn more about the software integration, how it works and why we don't automatically sync these changes here:
Software Integration Explained
WISECP Integration Installation
In this section we will show you how to integrate WISECP with your website.
This guide assumes that you already have WISECP installed. We recommend that WISECP is installed in a sub-directory such as domain.com/clients/ (with your WordPress website installed on domain.com).
Install The WISECP Integration Template
Make a full backup of your WISECP files and database for safety
Download the Software Integration - TemplateName - WISECP Integration.zip file from inside your Zomex.com account.
Extract the ZIP file to your desktop
Upload the contents of the upload directory to your WISECP root directory. For example if WISECP is installed at domain.com/clients the directory to upload to would be: /public_html/clients/

Activate the template:
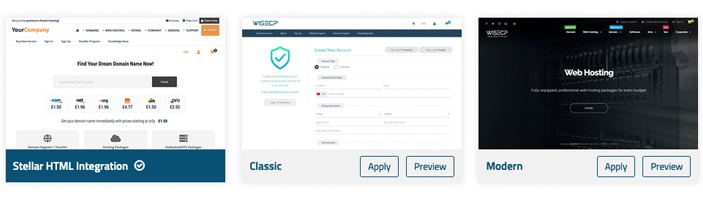
Lastly to activate your WISECP Integration template login to your WISECP admin area and go to Settings > Theme/Customization > Manage Theme > Click the apply button for your theme.
Activate WISECP Integration In Wizard Panel
The next step is to set WISECP as the software integration within the WizardPanel options panel.
Login to your WordPress Admin panel and click on the Wizard Panel button in the left sidebar.
Click on the Software Integration tab within the left menu. This tab is home to all of the software integration options and content.
Set the Software Integration to on.
For the Select Software dropdown select WISECP.
Set the full URL to your software path (e.g https://website.com/clients/).
If your software is installed on a sub-domain (e.g https://clients.website.com/) set the dropdown to on.
Click of the Save Changes button to apply the changes.
Integrate Your WordPress Theme Header/Footer With WISECP.
The final step is to apply the header/footer of your website to the WISECP Integration Template.
Scroll down to the Integration Code of the Software Integration tab. These blocks of code make up an exact copy of your website which is used to create a matching integration for WISECP.
Head
Copy the code from the Head box and paste in the following file:
/public_html/clients/templates/website/templatename_software_integration_wisecp/integration/integration-head.html
Header
Copy the code from the Header box and paste in the following file:
/public_html/clients/templates/website/templatename_software_integration_wisecp/integration/integration-header.html
Content Top
Copy the code from the Content Top box and paste in the following file:
/public_html/clients/templates/website/templatename_software_integration_wisecp/integration/integration-content-top.html
Content Bottom
Copy the code from the Content Bottom box and paste in the following file:
/public_html/clients/templates/website/templatename_software_integration_wisecp/integration/integration-content-bottom.html
Footer
Copy the code from the Footer box and paste in the following file:
/public_html/clients/templates/website/templatename_software_integration_wisecp/integration/integration-footer.html
WISECP Integration Completed
The integration with WISECP is now completed. When you view your WISECP you should now see your the header/footer/color scheme & settings match your WordPress website. The links in the menus and footer should work correctly going between WordPress (e.g Company, Web Hosting) and WISECP (e.g Client Area, Cart).
On-going changes to your header/footer
The integration between your website and WISECP Integration Template are static. If you make changes to your websites header/footer (e.g edit the menu, change color scheme) you will need to re-process the code in Integration Code. Generally after you have launch your business you will not need to update your website too frequently but for when you do the integration process is quick and easy. Learn more about the software integration, how it works and why we don't automatically sync these changes here:
Software Integration Explained
HostBill Integration Installation
In this section we will show you how to integrate HostBill with your website.
This guide assumes that you already have HostBill installed. We recommend that HostBill is installed in a sub-directory such as domain.com/clients/ (with your WordPress website installed on domain.com).
Install The HostBill Integration Template
Make a full backup of your HostBill files and database for safety
Download the Software Integration - TemplateName - HostBill Integration.zip file from inside your Zomex.com account.
Extract the ZIP file to your desktop
Upload the contents of the upload directory to your HostBill root directory. For example if HostBill is installed at domain.com/clients the directory to upload to would be: /public_html/clients/

Activate the template:
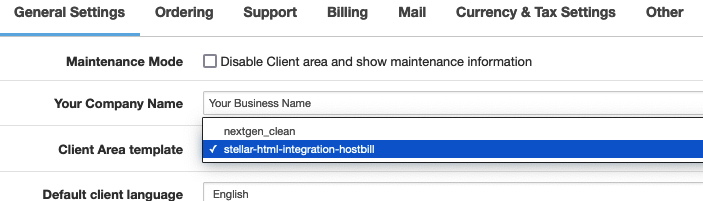
Lastly to activate your HostBill Integration template login to your HostBill admin area and go to Settings > General Settings > Select your template under Client Area template and save.
Activate HostBill Integration In Wizard Panel
The next step is to set HostBill as the software integration within the WizardPanel options panel.
Login to your WordPress Admin panel and click on the Wizard Panel button in the left sidebar.
Click on the Software Integration tab within the left menu. This tab is home to all of the software integration options and content.
Set the Software Integration to on.
For the Select Software dropdown select HostBill.
Set the full URL to your software path (e.g https://website.com/clients/).
If your software is installed on a sub-domain (e.g https://clients.website.com/) set the dropdown to on.
Click of the Save Changes button to apply the changes.
Integrate Your WordPress Theme Header/Footer With HostBill.
The final step is to apply the header/footer of your website to the HostBill Integration Template.
Scroll down to the Integration Code of the Software Integration tab. These blocks of code make up an exact copy of your website which is used to create a matching integration for HostBill.
Head
Copy the code from the Head box and paste in the following file:
/public_html/clients/templates/designname-software-integration-hostbill/integration/integration-head.html
Header
Copy the code from the Header box and paste in the following file:
/public_html/clients/templates/designname-software-integration-hostbill/integration/integration-header.html
Content Top
Copy the code from the Content Top box and paste in the following file:
/public_html/clients/templates/designname-software-integration-hostbill/integration/integration-content-top.html
Content Bottom
Copy the code from the Content Bottom box and paste in the following file:
/public_html/clients/templates/designname-software-integration-hostbill/integration/integration-content-bottom.html
Footer
Copy the code from the Footer box and paste in the following file:
/public_html/clients/templates/designname-software-integration-hostbill/integration/integration-footer.html
HostBill Integration Completed
The integration with HostBill is now completed. When you view your HostBill you should now see your the header/footer/color scheme & settings match your WordPress website. The links in the menus and footer should work correctly going between WordPress (e.g Company, Web Hosting) and HostBill (e.g Client Area, Cart).
On-going changes to your header/footer
The integration between your website and HostBill Integration Template are static. If you make changes to your websites header/footer (e.g edit the menu, change color scheme) you will need to re-process the code in Integration Code. Generally after you have launch your business you will not need to update your website too frequently but for when you do the integration process is quick and easy. Learn more about the software integration, how it works and why we don't automatically sync these changes here:
Software Integration Explained
FOSSBilling Integration Installation
In this section we will show you how to integrate FOSSBilling with your website.
This guide assumes that you already have FOSSBilling installed. We recommend that FOSSBilling is installed in a sub-directory such as domain.com/clients/ (with your WordPress website installed on domain.com).
Install The FOSSBilling Integration Template
Make a full backup of your FOSSBilling files and database for safety
Download the Software Integration - TemplateName - FOSSBilling Integration.zip file from inside your Zomex.com account.
Extract the ZIP file to your desktop
Upload the contents of the upload directory to your FOSSBilling root directory. For example if FOSSBilling is installed at domain.com/clients the directory to upload to would be: /public_html/clients/
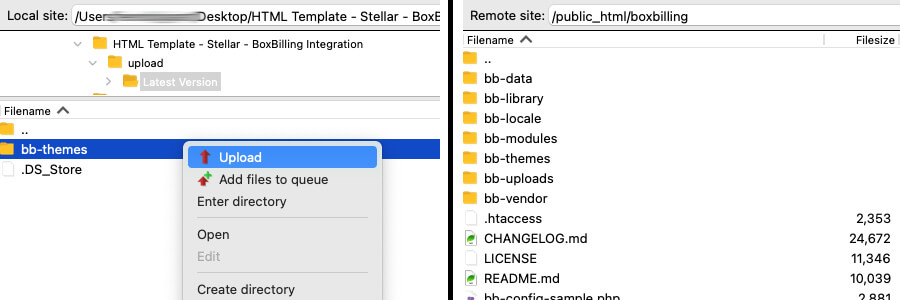
Activate the template:

Lastly to activate your FOSSBilling Integration template login to your FOSSBilling admin area and go to Settings > All Settings > Theme > Click the Set as default button next to the template.
Activate FOSSBilling Integration In Wizard Panel
The next step is to set FOSSBilling as the software integration within the WizardPanel options panel.
Login to your WordPress Admin panel and click on the Wizard Panel button in the left sidebar.
Click on the Software Integration tab within the left menu. This tab is home to all of the software integration options and content.
Set the Software Integration to on.
For the Select Software dropdown select FOSSBilling.
Set the full URL to your software path (e.g https://website.com/clients/).
If your software is installed on a sub-domain (e.g https://clients.website.com/) set the dropdown to on.
Click of the Save Changes button to apply the changes.
Integrate Your WordPress Theme Header/Footer With FOSSBilling.
The final step is to apply the header/footer of your website to the FOSSBilling Integration Template.
Scroll down to the Integration Code of the Software Integration tab. These blocks of code make up an exact copy of your website which is used to create a matching integration for FOSSBilling.
Head
Copy the code from the Head box and paste in the following file:
/public_html/clients/themes/designname-software-integration-fossbilling/html/integration/integration-head.html
Header
Copy the code from the Header box and paste in the following file:
/public_html/clients/themes/designname-software-integration-fossbilling/html/integration/integration-header.html
Content Top
Copy the code from the Content Top box and paste in the following file:
/public_html/clients/themes/designname-software-integration-fossbilling/html/integration/integration-content-top.html
Content Bottom
Copy the code from the Content Bottom box and paste in the following file:
/public_html/clients/themes/designname-software-integration-fossbilling/html/integration/integration-content-bottom.html
Footer
Copy the code from the Footer box and paste in the following file:
/public_html/clients/themes/designname-software-integration-fossbilling/html/integration/integration-footer.html
FOSSBilling Integration Completed
The integration with FOSSBilling is now completed. When you view your FOSSBilling you should now see your the header/footer/color scheme & settings match your WordPress website. The links in the menus and footer should work correctly going between WordPress (e.g Company, Web Hosting) and FOSSBilling (e.g Client Area, Cart).
On-going changes to your header/footer
The integration between your website and FOSSBilling Integration Template are static. If you make changes to your websites header/footer (e.g edit the menu, change color scheme) you will need to re-process the code in Integration Code. Generally after you have launch your business you will not need to update your website too frequently but for when you do the integration process is quick and easy. Learn more about the software integration, how it works and why we don't automatically sync these changes here:
Software Integration Explained
Request Support
We hope you found this documentation useful. If you run into any issues we will be happy to assist you.